MotorCity Cycle Instructions
Road Radio Installation
For a PDF file of these instructions with pictures Click Here (6.7 megs)
Most any car stereo shop can install your Road Radio
Caution: To prevent a short circuit remove the key from the ignition and disconnect negative battery terminal. Do not use thread locker products such as lock-tite.
Needed for installation:
1) Leave windshield on bike position box on windshiled to make sure box clears everything before drilling radio box. Mark holes at dimples on box. Drill 3 x 5/16” holes. Remove windhshield from bike, cover work bench with blanket or soft cloth to protect the windshield from possible scratches. Remove three bolts, two on bracket, one in middle, from the center of windshield. Do not reuse stock hardware. Using hardware provided, align and secure box starting with middle bolt. Continue installation by screwing bolts tight.
2) For all Heritage Springers, it is also necessary to drill 2 x ¼” holes in windshield frame. Using center punch mark both holes and carefully drill with sharp ¼” bit. Position box on
winshield.
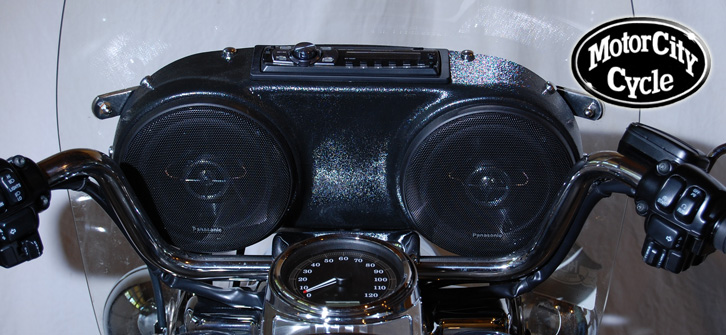
3) Install speakers using screws DO NO USE SPEED CLIPS. Speaker terminals MUST BE FACING UP towards top of box. Allow six inches of lead wire on each speaker.
4) Solder speaker wires to front speaker stereo harness. Finish with tape or heat shrink tubing. install rubber grommet for power wires.
5) Solder quick disconnect power lug to stereo harness using male end of stereo box
and female end on bike
6) Install sleeves and bend the tabs of the mounting sleeves with a screwdriver or a
similar and attach in place.
7) Unwind antenna wire and plug into stereo. Antenna wire may be left in box or run
outside the box in grommet for maximum reception. DO NOT ground antenna wire
8) Install 4 mm back brace stud to rear of radio. Lockdown stud to radio with two
flat nuts. The stud provided is perfect for most stereos. Length and thickness
may vary for other brands of stereos.
9) Install stereo plug into stereo.
10) Install stereo into sleeve until it clicks
11) Push T shaped rubber bushing onto back brace stud and secure with flat washer
and nylon lock nut of radio box.
12) Locate two power sources and solder yellow wire (constant 12v power source) to
Both power leads must one and red wire (switched power source) to the other be fused and hooked up for the stereo to play.
13) Locate ground source. Solder black wire to ground source.
14) Reattach windshield to bike.
15) Plug in quick disconnect plug. Reattach ground lead to battery.
WHENEVEVER WINSHIELD IS REMOVED STEREO MUST BE REPROGRAMMED.